So you are looking for Apple Homekit enabled devices to secure and automate your home and you want to take the control in your hands?
Wonderful! You are not alone.
A lot of people are going for the ‘smart home’ option and making their homes secure and keeping an eye from remote locations and automating different things which are necessary.
There are plenty of options available, but if you are using iPhones, Apple has a complete solution for this called Apple HomeKit.
What is Apple HomeKit?
HomeKit is Apple‘s latest framework for complete home automation. Manufacturers can implement the Apple HomeKit framework into their smart devices and automate their homes. HomeKit is all over the news and a lot of people are eager to install it in their home.

HomeKit installation can seem daunting. But, there is no need to worry because this article contains all you need to know about Apple’s HomeKit framework. In this article, we will explain:
1) What are the best accessories compatible with Apple HomeKit
2)How does the Apple HomeKit work?
3)How to setup Homekit-enabled accessories? and
4)How to troubleshoot in case anything goes wrong?
We have also collected the best HomeKit enabled devices and accessories out there to get you started. So, read on and find out all you need to know about how to use HomeKit to make your home secure and ‘smart.’
Ultimate HomeKit-Enabled Devices & Accessories
With every new day, we see a lot of new smart devices coming to the market so first we will have a look at all the devices and accessories which support Homekit and then we will review some of the best homekit devices and accessories in one place.
Best HomeKit Compatible Smart Lights

- C-Sleep LED light bulb designed for your natural sleep cycle by GE
- C-Life everyday LED light bulb by GE
- iDevices Socket and WiFi light bulb adapter
- iLuv Rainbow8 WiFi multicolor LED light bulb
- Incipio CommandKit Wireless Smart Light Bulb Adapter with Dimming
- Koogeek Socket and smart light bulb adapter
- LIFX WiFi multicolor LED smart light bulb
- LIFX + WiFi multicolor LED smart light bulb with Infrared Night Vision
- Nanoleaf Auror Smart Lighting Kit
- Nanoleaf Smart Hub and LED Lighting
- Opro9 iU9 Smart Lightbulb Socket
- Philips Hue Go with Hue bridge
- Philips Hue 2nd Gen Lightstrip Plus with Hue bridge
- Philips Hue White Ambiance Bulb with Hue bridge
Best Homekit Compatible Smart Switches

- Elgato Eve Light Switch, a connect wall switch
- iDevices Smart Light WiFi Wall Switch
- Koogeek Smart Light WiFi Switch (1-Gang)
- Legrand Celiane with Netatmo
- Leviton Decora Smart 15A Switch
- Lutron Caseta Wireless In-Wall Light Dimmer with Caseta Wireless bridge
Best Homekit Compatible Outlets

- ConnectSense Smart Outlet
- Elgato Eve Energy Switch and power meter
- iDevices Switch WiFi smart plug with power monitoring
- iHome Control Smart Plug iSP8
- Incipio CommandKit WiFi Smart Outlet with energy monitoring
- Koogeek P1 WiFi Smart Plug
Best Homekit Thermostats

- Bryant Housewise Thermostat
- Carrier Côr WiFi Programmable Thermostat
- ecobee ecobee3 WiFi Thermostat with sensors
- ecobee ecobee3 lite Smart thermostat
- Elgato Eve Thermo with Bluetooth
- Honeywell Lyric Round 2.0 Wi-Fi Programmable Thermostat
- Honeywell Lyric T6 Pro Wi-Fi Programmable Thermostat
- iDevices WiFi enabled Thermostat
- Sensi Wi-Fi Programmable ThermostatYou can see all best smart thermostats listed here with reviews
Best Homekit Compatible Windows and Shades

Best Homekit Compatible Fans

- Hunter Apache – 54” Ceiling Fan
- Hunter Signal – 54” Ceiling Fan with WiFi compatibility
- Hunter Symphony – 54” Ceiling Fan
Best Homekit Compatible Air Conditioners and Heaters

Best Homekit Compatible Sensors

- ConnectSense Temperature & Humidity Sensor
- ConnectSense Water Sensor
- Elgato Eve Door & Window Wireless Contact Sensor
- Elgato Eve Wireless Motion Sensor
- Elgato Eve Room Wireless Indoor Sensor
- Elgato Eve Weather Wireless Outdoor Sensor
- Fibaro Modern Door/Window Sensor
- Fibaro Flood and water Sensor
- Fibaro Motion Sensor with Z-Wave multi-sensor
- Onelink by First Alert GLOCO Environment Monitor
- Onelink by First Alert Smoke + Carbon Monoxide Alarm
- iHome Smart Home Monitoring Sensor
- Kidde RemoteLync Monitor with RemoteLync bridge
- Netatmo Healthy Home Coach & Indoor Climate Mintor
Best Homekit enabled Security

Best Homekit enabled Smart Locks

- August Smart Lock
- Friday Smart Lock
- Kwikset Premis Touchscreen Smart Lock
- Schlage Sense Smart Deadbolt
- Weiser Smart Key Deadbolt Double Cylinder
- Yale Assure Lock HomeCheck out the complete list of smart locks here with reviews
Best Homekit Compatible Cameras

Best Homekit Compatible Doorbells

Best Homekit Enabled Bridges

Although we have listed down most of the Homekit enabled devices but not all of them are best. Some of them are still in their maturity phase. But there are some accessories which are really good and worth your money. Lets have a look at some of the best and top rated accessories and devices a little deeper.
August Smart Lock 2nd Generation
The August Smart Lock is a really formidable piece of engineering. And now, the 2nd-generation model is available on the market. The upgraded model offers HomeKit support for control via Siri, which makes it even better than it used to be.

The August Smart Lock basically protects your home and turns your smartphone into a key. You can lock and unlock your property, control specifically who has access at any given time and even keep an activity log of who enters and exists 24/7. All this can be done through an app or via Siri commands.
The second-generation smart lock features an enhanced streamlined design. The new design has a new magnetic faceplate, along with micro-patterns that improve grip and rotation. Moreover, there is also an indicator light at the top of the lock for clear, visual confirmation that the door is locked or not. The Apple HomeKit-enabled smart lock is available in two colors; silver and dark gray.
Pros:
- Easy installation.
- Simple software.
- Siri integration.
- Works with Nest platform.
Cons:
- Compatible with all deadbolts.
- HomeKit setup is a little complicated.
Overall, the customer responses for this Smart lock have been mostly positive. The installation of the Smart lock is easy according to customers. If you have an Apple TV you can also control your smart accessories when away from home. You can also read about some of the best smart locks to keep your home secure as well.

Kwikset SmartCode 916 Touchscreen Electronic Deadbolt with Z-Wave
Smart locks allow us to avoid carrying keys and the frustrations of forgetting or missing them all over the place by making key-free entry mainstream. Because of smart locks and HomeKit, you don’t even need to lift a finger to unlock your doors.

Kwikset’s first HomeKit-enabled product, the Premis lock features a white LED display and a capacitive touchscreen. The company has announced its plans for the Premis smart lock which is the company’s first Apple HomeKit-enabled smart lock.
Premis will allow users to lock and unlock the door through Siri voice commands. Besides, the remote control, the Premis can also be integrated with other HomeKit-enabled accessories, such as temperature and lighting controls. Other perks include a white LED display, secure screen, and options for up to 30 unique user codes.
Pros:
- Built-in alarm.
- High-end hardware and construction.
- You can assign up to 30 user codes.
- Allows you to use your old house keys.
Cons:
- No stand-alone app.
- Requires Z-Wave or ZigBee home automation network to use all its features.
A lot of users have highly praised the device’s features and security. Customers also stated that the installation of the lock is also very easy and you can do it without someone else’s help.
Canary All-in-One Home Security System and Camera:
The Canary All-in-one Home security system is one of the many great HomeKit enabled systems currently available on the market. It comes with an HD, night-vision camera and a bunch of sensors for things like motion, temperature, and air quality.

The Canary offers a complete security system with high-end features. It allows you to stream videos of your home in real-time and also receive notifications whenever there is any movement detected. There is also no monthly or installation fee for this security device.
The HomeKit enabled Security System is also designed to get smarter the more it is used. It also comes with free cloud storage and video downloads. The app is also free so anyone in the house can download it without any charge to access the security system.
Pros:
- Great video quality.
- Night vision mode.
- Home health sensors are accurate.
Cons:
- Motion sensors are overly sensitive.
- Setup may need some technical knowledge.
A lot of users have highly praised the device’s features and security. However, some claim that the motion sensor is too sensitive. The camera of this system and its night mode have also been highly praised. You can also use one of the best wireless doorbell camera to monitor the visitors to your home remotely.
Schlage Sense Smart Deadbolt:
The Schlage Sense Smart Deadbolt is a HomeKit-enabled lock that you can control using Siri on your iPhone, iPad, or iPod touch. This lock is available in two trim designs; Camelot and Century. You can get it in three finishes: Satin Nickel, Matte Black, or Aged Bronze.

The deadbolt is a little pricey, but it is worth the money you pay if you have an Apple TV. However, if you don’t own an Apple TV and don’t plan on buying one, then there are other Smart locks that will be better suited.
The Schlage Sense also features numeric keypads. The lock also allows you to assign user-specific codes for different people. The lock can hold 30 access codes at a time. One of the great features of the lock is that you can set the lock to automatically lock after a pre-defined time period.
Pros:
- Simple and minimalistic.
- Siri compatibility.
- Powered by external batteries.
Cons:
- Wireless access only possible if Apple TV is present.
- Bulky design.
- Expensive compared to other HomeKit-enabled Deadbolts.
Users indicate that the lock is simple to install and works well. The Siri integration is also great. However, if you don’t have and Apple TV, then you won’t be able to access you smart lock outside the Bluetooth range. Apple TV acts as a bridge to allow your WiFi remote access.
Ecobee Remote Sensor:
The Apple HomeKit enabled ecobee Remote Sensors are additional sensors for the ecobee3 WiFi thermostats that you can place around your house to more accurately monitor and manage temperature with its powerful homekit temperature sensor capability. These sensors can be placed all over your house in different rooms so you can easily control the temperature in your home using your iPhone, iPad, iPod, or Apple Watch.

These ecobee Remote Sensors can be bought as a pack of two. Or, you can also buy the kit that comes with the sensors as well as the thermostat. The sensors simply allow you to regulate hot and cold spots in your favorite rooms for greater comfort. They also provide smart energy saving when you are out of your home.
Pros:
- Sensors come with stands so you can place them anywhere.
- Communicates with the thermostat wirelessly.
- Smart energy saving when you are not at home.
- 120-degree horizontal field of view.
Cons:
- Sometimes they lose connection.
- Temperature readings can sometimes deviate.
Overall the customer responses for this sensors have been positive. Users say that the sensors are a great selling point for the thermostat. Setting up the sensors is also simple and easy.
Elgato Eve Weather Sensor:
This weather sensor is designed to sense the temperature, humidity, and air pressure in the immediate vicinity of your house. The Elgato Eve Weather Sensor is HomeKit enabled and it is powered by long-lasting, replaceable batteries. The accessory also works with Siri so you can just ask for temperature and humidity readings. it has powerful homekit temperature sensor.

The Eve Weather cannot detect rain or snow, but it is sturdy and can survive harsh weathers. The data it collects can be viewed by day, month, or year. The sensor also has an easy direct connection using Bluetooth Smart technology and requires no hub or gateway. You can access your personal weather data via the free Elgato app on your iPhone or iPad.
Pros:
- Easy and simple setup.
- Long lasting batteries.
- Also good for indoor use.
Cons:
- The companion app is not user-friendly.
- Short range.
Users like the accessory’s compact and discrete design. Conversely, some customers indicate that the app is hard to use and the interface isn’t very user-friendly and is quite limited.
Elgato Eve Room Sensor:
Elgato Eve indoor sensor is one of the first Apple HomeKit enabled products. The Eve Room is capable of measuring temperature and humidity while also determining the number of volatile organic compounds in the air. This accessory is especially for those suffering from extreme allergies, or those painting or renovating their home, trying to figure out if the room they’ve aired out is now good to go. It also has powerful homekit temperature sensor.

The Elgato Eve Room Sensor doesn’t offer anything special in terms of functionality apart from its HomeKit compatibility. The sensor is powered using AA batteries and comes with a slot at the back so you can mount it on a nail in the wall. The Elgato Eve sensor can be used to gain insights through your personal data. This temperature sensor is Apple HomeKit-enabled and works with Siri. You can easily ask Siri for the temperature or humidity of the room.
Pros:
- Accurate readings of temperature, humidity, and volatile organic compounds.
- Siri-compatible.
Cons:
- No push notifications.
- Limited Bluetooth range.
- Calibrating to a new location takes a lot of time.
- No WiFi connectivity.
Users say that the device falls short in a lot of aspects. The main one being that there are no push notifications. The best aspect of this device, however, is its ability to sense the volatile organic compounds in your home.
Elgato Eve Door & Window Wireless Contact Sensor:
Elgato Eve Door Wireless contact sensor allows you to easily monitor your doors and windows. You can immediately check which doors and windows are open in your property and also gain insight on how often doors are opened or left opened.

Elgato Eve is Apple HomeKit-compatible and it has Siri support. So you can easily use an app to monitor your doors and windows or you can also ask Siri if your doors or windows are left open or not.
The contact sensor is truly wireless and it is powered by a replaceable battery. It is easy to setup and it uses Bluetooth smart technology, no hub or gateway is required for the setup.
Pros:
- Easy to install.
- Long lasting battery.
Cons:
- No waterproof certification.
- No push notifications.
A majority of the users say that the configuration options are lacking. However, the sensor reports accurately on most accounts.
Onelink Wi-Fi Smoke + Carbon Monoxide Alarm:
FirstAlert introduced HomeKit-enabled smoke and CO detector in 2015 and since then the company has unveiled three other accessories that can be controlled with an iOS device.
The Onelink by First Alert is a Wi-Fi Environment Monitor that can detect high and low levels of CO in your home along with humidity and temperature levels. There is also a multicolor LED which offers a quick status update on a room’s conditions.

Along with Siri compatibility, the Onelink by First Alert Wi-Fi Safe can be locked or unlocked with the companion app. The safe is operated with battery power. It is also capable of detecting motion and will alert you if an unauthorized person attempts to open or move it.
Then there is the Onelink by First Alert Wi-Fi Thermostat which allows users to control their heating and air conditioning systems seamlessly. And, it also features remote temperature controls, a full-color touchscreen, scheduling options, home and away settings, and more.
Pros:
- High-end hardware.
- Nice design.
- Very responsive.
- Consistent.
Cons:
- The companion app has faults.
- Push notifications and in app-silencing are too slow.
Customers indicate that while the alarm is highly responsive and consistent the app lacks in many accounts and the push notification and in-app silencing is also very slow.
Connect Sense Temperature and Humidity Sensors:
The Grid Connect Sense Wi-Fi smart outlet is also a cool HomeKit-enabled accessory. Other than the smart outlet Grid Connect is also launching two Apple HomeKit-enabled temperature sensors later this year, which tells us about the dedication of the company to improve in the area.

The Connect Sense’s temperature and humidity sensors are perfect for locations that won’t fit a thermostat. For example, the storage area, basement or the greenhouse. Also, the Connect Sense Water Sensor is a brilliant smart sensor that can detect leaks and alert the user on their iOS device.
Both of the sensors work with Siri so you can use Siri voice commands to check status or access settings. They are powered by Bluetooth Low Energy and a pair of AAA batteries.
Pros:
- Easy installation.
- Reliable.
- SMS notification system.
Cons:
- Poor customer service.
- No companion app.
- The website isn’t user-friendly.
Users say that the device falls flat on a lot of aspects. The main one being that there is no app and that you have to go to their website which is not properly designed. Moreover, users also indicated that the ConnectSense’s customer service is not great as well. The best aspects of this device, however, are that it is easy to install and also offers SMS notifications.
Best Apple HomeKit enabled Heating & Cooling Accessories
iDevices Thermostat:
The iDevices thermostat is another brilliant Homekit-enabled smart accessory. There are a lot of great homeKit thermostats in the market currently and iDevices is one of the best.

The iDevice Thermostat packs complete Apple HomeKit compatibility, allowing users to give commands to Siri like “set my home temperature to 55-degrees.” Through Siri voice commands and custom scenes you can control the temperature of your home from anywhere.
Aside from Siri commands, you can also control the thermostat through an app. You can also use scenes and triggers to control the temperature. No Hub or subscriptions are required for the setup, the iDevices thermostat only needs Wi-Fi for the setup.
Pros:
- No Hub required.
- Nice design.
- Customizable
Cons:
- HomeKit connections are a hit or miss.
- The interface has usability problems.
- Very few smart features.
Most of the users are pleased with the devices. Scheduling is easy and the homeKit thermostat also has sensitivity adjustments to allow for temperature differences between locations. However, some user said that the iDevices thermostat is a little difficult to program. Checkout our reviews of some other best smart thermostats as well.
Ecobee3 Smart Wi-Fi Thermostat:
A thermostat is arguably one of the most crucial home appliances. Manually managing a heating system can get frustrating sometimes and lead to several issues. Sometimes your home can end up being too hot or too cold. Your heating system may also be using more energy than needed by being on when it is not needed.

This is where Ecobee3 comes into play. The second generation Ecobee3 smarter Wi-Fi thermostat keeps your home at just the right temperature. The thermostat does this by gathering information about your daily activity and routines at home. And then organizing heating schedule accordingly to conserve energy.
Ecobee3 is a smart thermostat that is supported by Apple HomeKit and Siri. The heating and cooling can be directly controlled by using an app or through Siri commands.
Pros:
- Remote sensor extends temprature and motion sensing range.
- Smart Home/Away feature.
- IFTTT channel.
Cons:
- Rewiring required if your HVAC system doesn’t have a C wire.
What makes these homekit thermostats so great are the external sensors that you can place around the house.
Honeywell Wi-Fi Smart Touchscreen Thermostat:
Honeywell also announced a thermostat recently that will be HomeKit and Siri-enabled. The second-generation Lyric thermostat can be controlled by using voice commands. Furthermore, it can also adjust the temperature based on outdoor conditions.

Moreover, the thermostat is capable of sending notifications to iOS devices and it can also work with third-party devices. Honeywell thermostat also has geofencing features so the Lyric will know when you’re home or away, and adjust comfort levels accordingly.
Pros:
- Simple and straightforward management software.
- Adapts to usage habits.
- Touch screen display
Cons:
- Not as intuitive as other thermostats around.
- No motion sensors.
Depending on your previous homekit thermostat and wiring, it is very easy to setup.
Best Apple HomeKit enabled Lights and switches
Philips Hue Go:

Additionally, it also has smart battery management and while it doesn’t require a Hub to work App control and extended features can only be achievable via a Hub.
The bottom line is that while there are quite a few less expensive options available, the Philip Hue is reliable and a fun portable addition to your HomeKit connected Home. The lamps portability is the true selling point.
Pros:
- Portable.
- Easy to use.
- 16 million colors.
Cons:
- Slightly expensive.
- Brightness isn’t very high.
- Requires a Hub for full utilization.
It is easy to use and the design is also highly praised. The accessory also has a timer built in so you can set it to automatically switch on or off. Users also said that it operates at the same level whether plugged in or on charge.
Philips Hue Tap Switch:
The Philips Hue Tap Switch is a kinetic powered HomeKit enabled accessory which is used to control your Philips Hue bulbs. Additionally, the Hue Tap Switch features four buttons that allow you to instantly select favorite scene creations you’ve set up with the Hue app or control groups of lights.

The Philps Hue Tap Switch is slightly expensive, but if you can afford it and already have Philips Hue LEDs at your home then it is a great addition. You can place the switch anywhere you want to in your home to easily control the lights. The design of the device is also minimalistic and doesn’t stand out negatively.
Pros:
- Wireless.
- Kinetic powered.
- Minimalistic design
Cons:
- Stiff buttons.
- No IFTT integration.
While the Switch is convenient it is limited in some aspects. The best aspect of this device, however, is that it is not battery or electricity powered and works on a Kinetic powered design.
Philips Hue Bridge 2nd Generation + Lights
The Philips Hue range of intelligent bulbs is quite popular when it comes to smart accessories. The lamps and the bulbs produce the light output but the real intelligence behind the hue bulbs is the Hue Bridge.

The second generation HueBridge is what makes the bulbs controllable via HomeKit. It connects directly to the router. You can control old Philips Hue bulbs as well as new ones with this HomeKit compatible Bridge.
Philips Hue range is one of the best affordable, intelligent home automation products. Hue Bridge 2.0 allows your bulbs to be seamlessly controlled by Siri. You can easily use commands such as “Turn all light green” or “Dim all lights to 50-percent.”
Pros:
- Siri integration provides voice control.
- Can connect up to 50 bulbs.
Cons:
- Expensive.
What makes the bridge so great is the Siri voice integration that allows you to control the bulbs why voice commands. It is also very easy to install.
Lutron Caseta Wireless Smart Lighting In-Wall Dimmer Kit:
Lutron Caseta Dimmer Kit comes as a little bundle of goodies. The package includes a Caseta Wireless Smart Bridge, two Pico remote controls, two Caseta Wireless in-wall dimmers, and the accompanying accessories to fit them all in the home. Also, Lutron allows functionalities like setting schedules for your lights as well as the ability to use Siri to instantly control your scenes and lighting environment.

Then there is Lutron’s HomeKit-enabled Caséta Wireless Smart Bridge which also allows you to open and close shades. The bridge comes with HomeKit integration. Furthermore, Lutron has also very recently added shade control into that wireless mix.
If you have the DIY version of the Wireless Smart Bridge, you can use Siri and the power of your voice to control Serena battery-powered shades. Homeowners with the Smart Bridge Pro can use HomeKit to tap into Lutron Sivoia QS Triathlon wireless shades, Sivoia QS drapery tracks, the Kirbé vertical drapery system, tensioned shades, pleated shades, and Roman shades
Pros:
- Easy setup.
- Reliable and responsive.
- High-end hardware.
- Works great with the mobile app, Apple watch, and Siri.
Cons:
- Can’t control non-Lutron devices.
- Requires ethernet port.
- Not so great for non-iOS users.
It is not perfect but the dimmer kit comes pretty close to it. Easy to setup and very reliable and responsive.
Elgato Eve Energy Switch & Power Meter:
The basics of home automation include the ability to switch on or off your devices with the simple touch of a button in your application or through voice control. The Elgato Eve Energy Switch & Power Meter allows you to do just that and more.
The Elgato Eve works similarly to other smart plugs currently available in the market. Plugging the Elgato Eve into the wall outlet allows appliances to be switched on and off via iPhone, iPad, or an Apple Watch app.

One of the defining features of the smart plug is the statistics of energy usage that it will actually bring to users making the decision to buy it. It allows immediate feedback and precision on how much energy a connected device is using. Then there is the fact that it gives an instant insight into energy consumption. This allows users to decide if an appliance is consuming too much power.
Elgato is also among the smart accessory and home automation companies that support Apple HomeKit Framework in its devices. This means that Apple device owners can also use Apple’s Siri digital voice assistant to power on or off any connected appliances.
Aside from Siri command compatibility, HomeKit support also allows the usage of triggers to automate certain actions. Moreover, the smart plug can also be controlled without Siri by using the Elgato Eve app for iPhone and iPad.
Pros:
- Compact design.
- Great app.
Cons:
- Expensive.
- Can’t control remotely without Apple TV.
The device is a great accessory for those who are looking to conserve energy and cut consumption costs. You will enjoy our review of some of the best smart switches and plugs as well.
iDevices Switch:
The iDevices Switch offers similar functionality to the iHome smart plug. You can plug in accessories and appliances into the socket. The switch is easy to use and it allows you to monitor and schedule home appliances.

The iDevices Switch is HomeKit enabled and works with Siri. So, you can give Siri voice commands to control the switch. The switch can be controlled from anywhere via you iOS device. It also allows you to make smarter energy saving decisions that will help lower your utility bills. This is done by monitoring electricity usage by appliances in your home.
It also includes a customizable LED night light which can be set to any color, saturation, and brightness. Additionally, the LED night light can also be set to turn on or off at specific schedules.
Pros:
- Simple setup.
- Great companion app.
- Remote access.
- Energy tracking.
Cons:
- Exclusive to iOS.
- No dimmer.
- No IFTTT support.
The switch is easy to setup and the HomeKit integration makes it amazing. Unfortunately, it is only available for iOS devices and users also say that a dimmer function would have been a nice addition.
iHome iSP5 WiFi Smart Plug:
The iHome iSP5 offers seamless Apple HomeKit and Siri support, but also extends a little beyond that by offering support for other platforms like the Nest, Wink, and Amazon Echo. iHome iSP5 smart outlet was launched last year. The outlet can monitor power consumption and control small appliances.

iHome even comes with a remote control. Plugging things like lamps, air conditioners, heaters, and television sets directly into this smart plug will allow you to control their power state through applications, Siri, and more. iSP5’s sequel the iHome iSP8 is also expected to hit the market this year.
Pros:
- Affordable.
- Easy to use.
- Can organize your home into rooms and zones.
Cons:
- Setup is difficult.
- Not many intuitive features.
The app isn’t very well designed and has a lot of potential for improvement.
Best Apple HomeKit enabled Video Cameras
FLIR FX Outdoor Wireless HD Video Monitoring Camera:
The FLIR FX Outdoor Wireless HD Video Monitoring Camera it is wireless HD camera and has HomeKit enabled. It also features SmartZone technology that lets you set motion-sensing technology to create recordings and alerts only for specified areas.

This camera has 720p video streaming and 1080p video recording. The cloud storing service gives you unlimited storage space for up to two days. It also grants you access to video time-lapse and detection zone features. If you want to extend your storage time period then you can also do that. Seven-day storage costs $10 per month or $100 per year, and 30-day storage costs $20 per month or $200 per year.
The FLIR FX Outdoor IP Camera offers free cloud storage and it also features a microSD card slot. It comes with a power adapter. The camera also has a 4-hour backup battery. However, the camera lacks on quite a few accounts. There is no IFTT and its companion app also has a few glitches. Ultimately, the bottom line is that while the camera is quite adaptable it still has a lot of limitations and needs quite a lot of improvement.
Pros:
- Free cloud storage.
- Contains microSD card slot.
- 4-hour backup battery.
Cons:
- Incorrect activity log sometimes.
- Phantom alerts.
- App glitches.
- No third-party integrations.
- No IFTTT.
Best Apple HomeKit enabled Remotes And Other Accessories
Apple Remote:
The Apple remote allows users to easily control their Apple devices. The remote has a simple and minimalistic design and the buttons are also responsive. You can easily use the remote with your iPod if you have hooked it up to the home theater.

The Apple Remote also works with Mac. You can use it to browse through your photos, videos, music, and even DVDs. It also allows you to control the volume of the media that you are playing as well. There are also shuffle and skip buttons present. However, the Apple TV can only connect to one remote at a time so you cannot use multiple remotes for multiplayer gaming instead you will need an iOS device or a gaming controller. The Remote also features an accelerometer and gyroscope.
The majority of the users prefer this remote over the Siri remote because it is simplistic and operates well. The Remote ships with a battery and a user guide.
Pros:
- Works with most Apple products.
- No range issues.
- Buttons are responsive.
Cons:
- Buttons can get damaged easily.
- Too few buttons compared to your standard IR remotes.
Apple Siri enabled Remote:
The new Apple TV Siri Remote is built with Siri integration. The remote lets you control you Apple TV through voice commands. It also features a trackpad that can help you interact with the Apple TV. The buttons on the Siri remote also allow you to navigate easily so you have multiple ways to interact with your Apple TV.

The Siri Remote comes with a Lightning-to-USB Cable that is used to charge the remote and a user guide. Unfortunately, there is no power adapter. You will need to buy it separately or use one from your other Apple devices. The Siri Remote has a comfortable design that fits well in your hand and it also supports gaming.
However, the Apple TV can only connect to one remote at a time so you cannot use multiple remotes for multiplayer gaming instead you will need an iOS device or a gaming controller. The Remote also features an accelerometer and gyroscope.
The Siri Remote is powered by a rechargeable lithium-ion battery. It uses wireless Bluetooth 4.0 technology. The remote has two microphones for Siri communication.
Pros:
- Voice search.
- Comfortable to hold.
- Accelerometer and Gyroscope for gaming.
Cons:
- Sometimes touchpad is a little too responsive.
- Not very durable.
- Expensive.
The Siri Remote was not as well received by users as expected. Some users say that some of the Remote’s features hold back the Apple TV experience. The main thing that annoyed users was entering passwords and search terms using the trackpad and the onscreen keyboard.
Withings Aura Smart Sleep System:
The Withings Aura is a complete smart sleep system. It features an alarm clock, a bedside lamp, and a speaker all in one neat package. The Aura is capable of recording your sleep cycle and it also offers a smart wake-up feature as well. It also comes with and extra USB port that you can use to charge your smartphone. The Withings Aura works is available for both iOS and Apple users.

The Withings Aura is a little pricey compared to other sleep monitoring systems but it has a ton of interesting features as well. The free Health Mate app allows you to visualize your sleep cycles, understand what wakes you up and when, and compare nights sleep. It is ideal for monitoring and improving your sleep patterns over time and will help you sleep better as well.
The Withings Aura Smart sleep system ships with a sleep sensor, universal power supply, and a quick start guide. The device has a simple design but it needs to be placed within 1 meter of your bedside.
Pros:
- Comes with extra USB port.
- Spotify integration.
- Smart alarm.
- Easy to use.
- Give detailed sleep analysis.
Cons:
- The smartphone has to be in range to record data.
- Connection issue.
- Single person support.
- Bed sensor occasionally makes buzzing noises.
Hunter Signal Ceiling Fan:
Now even ceiling fans are coming with Apple HomeKit compatibility. Hunter’s fans are Wi-Fi enabled and can be controlled by any iOS device. However, The fans aren’t exactly what you would call smart but thanks to the addition of HomeKit and WiFi they are the best in the market.

Users can easily control Hunter fan by using Siri voice commands. Furthermore, The fans can also be controlled through scenes. Multiple fans can also be controlled using voice commands.
Pros:
- Easy installation.
- Siri compatibility.
- High-quality build.
- Bulbs can be attached.
Cons:
- HomeKit setup is complicated.
- Lights can’t be dimmed using Siri.
How does Apple HomeKit work?
HomeKit is based on a database and a “Home” Manager. The database is stored in the iOS and it contains all the information about the home and the smart devices in them. Since everything is stored in one place, it makes it easier to manage.

Home Manager allows you to manage your home. You can manage multiple ‘Homes’ also if you have more than one. In the Apple Homekit hierarchy, ‘Homes’ are made up of ‘Rooms.’
Both Homes and Rooms in each house are given unique names for identification. ‘Rooms’ can also be grouped into zones like “upstairs” and “downstairs” so you can specify actions for zones easily.
Read More: Best 3D Pens – Squeeze to Draw
Developers can easily work with Apple HomeKit. They can do this by developing a HomeKit Accessory Simulator with the help of the Xcode 6 or above.
HomeKit helps to make your home automated by tackling the complex problems of automation and making the solution simple enough to fit into your Apple iOS device. HomeKit is still quite new so glitches and kinks are expected but HomeKit is a breakthrough framework for home automation.

Why Should you use HomeKit?
The main question that most people will have is: Ss the HomeKit automation worth it? Is it a good investment? Will it pay off in the future or will it be rendered obsolete?
So, here’s the deal: Apple HomeKit is far from perfect. Its accessories started being launched in 2015 and the framework has a long way to go. There are still a few problems in the framework that need to be fixed, for example, sometimes Siri doesn’t work properly.
However, while the framework isn’t very reliable to use on door locks it is perfect for other basic services. It works great when it comes to lights, thermostats, plugs and other accessories. Also, Siri’s response rate and performance get better over time.

When it comes to automating your home using Apple’s framework it is best to start small. Maybe buy a $30 worth Apple HomeKit-enabled plug and see how it goes. Apple automation service is also big on security and that’s what keeps it ahead of other competitors like Wink and WeMo. The service also features Scenes which lets you configure complex actions that can be triggered by ‘commands’ through Siri.
Ultimately, Apple’s automation service still has a long way to go before it goes truly mainstream. However, for those who are eager for experimentation and early adoption, the framework is worthwhile. Aside from a few bugs, the framework is a blast. It also has a lot of potential for improvement in the future.
Apart from a few bugs, the framework is a blast. It also has a lot of potential for improvement in the future and Apple is making improvements on a regular basis.
Apple’s HomeKit App – Home:
Apple launched its automation framework HomeKit with the iOS 8. Since then, Apple HomeKit has been missing one crucial piece and that was a built-in app. The service had no Apple-supplied HomeKit-UI app, so all automation was controlled by third party applications. But now, with iOS 10, Apple has announced its own built-in HomeKit App called Home.
While the manufacturers make great smart accessories, the third party apps lack the integration and uniformity Apple made user interface would provide. With official iOS 10 launch, Apple’s built-in app will be a success undoubtedly but, there are some apps currently on the market that Apple’s built-in app might not be able to compete with.
HomeKit was first revealed at WWDC 2014 developers conference. The automation service launched three months later in September but the Apple HomeKit devices hit the market a year later. There are many accessories out in the market these days. Some of these are Philips Hue Lights, smart thermostats from ecobee, Honeywell etc.
All these devices have separate HomeKit controller applications by their respective companies. But the official Apple HomeKit built-in app for iOS 10 will control all the accessories.
However, Apple isn’t the first to create an iOS app that will solely control all Apple HomeKit accessories. There is a Home app currently in the market by Matthias Hochgatterer worth $15 that does just that. The Home app is arguably the best on the current market. Then there is also Hesperus, which is a high-quality free app that controls the HomeKit. It has also been updated to include notification center widget and 3D touch support.
Then there is also Hesperus, which is a high-quality free app that controls the HomeKit. It has also been updated to include notification center widget and 3D touch support.
Apple official HomeKit built-in application will be official, but that doesn’t necessarily mean that it will be the best one. Let’s have a brief look at each of these apps.
Home by Mattias Hochgatterer
Home app by Mattias Hochgatterer is the app the Apple should have offered with the home automation framework. The $15 Home is an all purpose HomeKit application that makes home automation simpler. The Home app lets you control and configure all your HomeKit devices, it displays all your HomeKit items at a glance.
With the app, you can add new items, assign them to zones and rooms, configure triggers and scenes.
The Home app makes the room and zone organization easier and simpler. The app allows you to jump from your overview to Zones and Rooms by just tapping the tab. From there, you can add or remove accessories, add and edit rooms and zones themselves, and control all your items.
The Home app also allows you to set scenes that are time-triggered, Siri command-triggered or even action-triggered. The scenes can include any Apple HomeKit connected device.
Then there are triggers, at their most basic, triggers can turn on or off your HomeKit accessories at a particular time. For example, you can add a time trigger “turn on lights in the dining room at 9PM” then your lights will automatically turn on at 9PM.
However, triggers can do much more than just that. For example, if you have door or motion sensors you can add a trigger that toggles an accessory when the motion sensor is activated or the door opens. You can also add certain actions to triggers if the temperature drops or rises.
Siri integration With Home App
When Siri is paired with the Home app it can recognize a variety of commands:
- Accessory names: “Turn on the Hue office light strip.”
- Room and Zones: “Turn on the lights in the dining area” or “Turn off the lights downstairs.”
- Scenes: “Emergency alert!” or “Set the ’emergency alert’ scene.”
- Individual accessory tweaking: “Set the lights to 60 percent” or “Set the office lights to blue” or “Set the temperature to 57.”
The rooms, zones, accessories, and scenes can also be renamed from the Home app. The bottom line is that if you have a lot of accessories at home the Home app is the best way of controlling them.
Apple Home App for HomeKit in iOS 10 – Preview
As discussed above, Apple is bringing the built-in Home App for Homekit framework in iOS 10 for iPhone and iPad and WatchOS 3 for Apple Watch. This is going to make Homekit more widely acceptable and improved.
Although the app works more like the other third party apps using the HomeKit framework. The built-in Apple Home app provides more controls and options like you can access it from Home screen on iOS 10 directly and control a lot of functions from the lock screen as well after the Homekit compatible accessories have been configured.
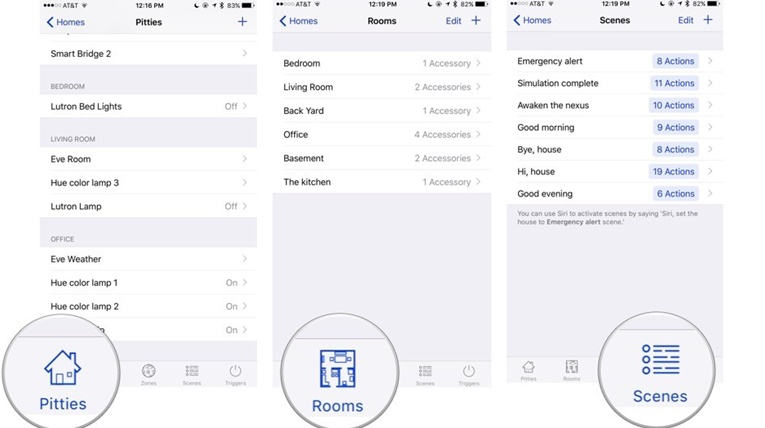
There are three main screens in the built-in Home app. Home, Rooms, and Automation. The Home screen shows the summary of activities and different statuses. You can also bring important scenes and accessories on Home screen as a shortcut. The Home screen also helps to add new accessories to your ‘smart Home’ without downloading the separate app for each accessory.
The second important screen is the Room screen. Here you can create as many rooms as required in your home along with scenes and accessories configured for that specific room. The iOS 10 Home app provides options to add custom wallpapers as backgrounds to identify different rooms visually.

The third and the most important screen is called Automation screen where you define all the triggers for active scenes and accessories. The automation screen is the backbone of the whole app where one takes the actual actions and the HomeKit starts working.
For example, one very useful trigger in the automation screen is sunrise/sunset. This trigger helps you turn on and off the lights accordingly. Without the built-in Home app for HomeKit, one was only able to control this with defining the time. But sunset and sunrise time changes day to day basis and this means some manual work every two-three days of changing the time. But now this cool trigger can do everything itself.
Although the Apple’s built-in Home app for HomeKit is still new and needs a lot of improvements but considering the point that HomeKit framework is itself in development phase this is understandable. The built-in app for iOS, WatchOS and TVOS will help you automate and control your smart home from all Apple devices including the iPhone, iPad, Apple Watch and Apple TV to some extent.
Update: With the release of iOS 10 the HomeKit integrations has improved significantly. The built-in Home app is now available in iOS 10. The new app is a centralized Hub that allows you to easily manage various connected Apple HomeKit enabled devices. It is quite easy to use and also simple to setup. The official app features integration with the control center, Siri support, and 3D Touch quick actions.
All the settings for the Home app are synced via iCloud. This will allow you to control any iOS device that is running on iOS 10 to easily control your HomeKit enabled devices. The official Home app is also free and provides seamless control of your automated Home. The new Home app is not perfect but it is the first step. It fulfills all the basic automation needs with utmost ease and has a lot of potential for improvement in the future.
How to setup Homekit Enabled Accessories?
To get started you will need to have iOS 8.1 or later installed on your iPhone, iPod touch, or iPad. You will also need one or more HomeKit Siri enabled accessories. You can buy smart plugs, lights, locks, thermostats, and more to control with HomeKit. After you have bought the accessories, you will need to do the following things to setup HomeKit in your home.
Download the HomeKit App:
First of all, after buying the accessories, download an app to manage HomeKit. The accessory itself will also come with an app but you can also use other third-party apps like Home if you don’t like the manufacturers one.
Then you will have to store and pair your Apple HomeKit enabled device. This will be done by using the special code that comes with the accessory.
Setup HomeKit:
After you have successfully paired your accessory, use Siri commands to control them. You can easily command Siri to turn off the lights or lowering the temperature. Some commands will require you to unlock your iOS device before Siri can execute them.
For example, if you are using a smart lock then you will need to unlock your iPhone, or another iOS device to open the door. This feature is of course for safety and security reasons.
There are commands for scenes, rooms, and triggers also. The complete list of commands is in the “HomeKit Siri Commands” section of this article. There are applications that will allow you to group accessories into rooms, zones, and scenes. We have also listed instructions on how to setup rooms, scenes, and zones in the next sections.
The accessories that have been grouped can be easily controlled together. You can also use a single command to turn all the lights on in the kitchen (if you have setup kitchen as a room in HomeKit). Scenes allow you to group actions, along with accessories, rooms, and zones. For example, Night time scene could lock your doors, turn off the lights in your house, and lower the temperature.
You can also reset the complete configuration of your HomeKit setup and begin from scratch. To do so you need to open the Settings app on your iOS device and then select Privacy. After that, select HomeKit and then tap “Reset HomeKit Configuration. This will completely reset HomeKit and delete all your accessories, rooms, zones etc.
Shared Connections:
You can use your HomeKit with multiple people. What does that mean? It means that you can grant access to your HomeKit house to more than one person. Adding new users to HomeKit is simple and we have listed the steps to do so in this article. They are located in the “How to share HomeKit access” section below.
The person who initially configures the Apple HomeKit house is the administrator. Only the administrator has access to add other users to the house. The guests have access to accessories, rooms, and zones. However, they cannot control triggers and scenes.
HomeKit and Apple TV:
While you are away from home, or not in range of your local network, you can setup your Apple TV to look after you home. To do this you will have to make sure that your Apple TV and iOS device is signed in with te same Apple ID account. Then you can remotely control your smart accessories by using Siri commands. For example, if you forgot to turn off the lights, or lock the door before leaving the house, you can remotely do so by using Siri commands.
If you have iOS 9 then you will not need the Apple TV to remotely control the accessories because it comes with HomeKit Accessory Protocol. HAP or HomeKit Accessory Protocol makes it easier to control your home via iCloud.
If for some reason your HomeKit isn’t working remotely with Apple TV here is what you need to do:
- Check your WiFi and internet connection on your Apple iOS device and Apple TV.
- Update the software on your Apple TV and iOS device.
- Make sure that your Apple TV is on the same Wi-Fi network as your HomeKit devices.
- Make sure Apple TV is within about 25 feet of your Bluetooth HomeKit accessories.
- Go to Settings > HomeKit and check that your iOS device has iCloud turned on.
- Make sure that your iOS device and Apple TV are not in Airplane Mode and are on the same network.
- Try signing out of iCloud and then sign in again after two minutes.
- Check that your iOS device and Apple TV are signed in to iCloud with the same Apple ID and password.
- Make sure that any HomeKit accessories you have added using your iOS device can be controlled on your Wi-Fi network or using Bluetooth.
- Restart your iOS device and Apple TV.
- Go to Settings > Airplane Mode and turn Airplane Mode on and off. Then try to control your HomeKit devices locally.
Lost or Stolen iPhone:
If by any chance your iPhone or iPad is lost or stolen, Apple allows you to remotely delete its contents. By using Find My iPhone you can turn on Lost Mode so no one can use it to remotely activate your HomeKit products. Apple also allows you to erase the contents of the device but only use this feature if you are sure you won’t be getting the iOS device back.
Controlling HomeKit with Apple Watch:
You can also use you Apple Watch to control your HomeKit products. The automation framework allows you to control the accessories by using Siri commands on your Apple Watch. You can easily turn the accessories on or off by using simple commands. “Adjust accessories” command can be used to configure the accessories.
If you have set up zones, rooms, or scenes you can use Siri to control them also. You can use Siri commands to execute or turn off a scene. Accessories grouped in rooms and zones can also be controlled by using Apple Watch via Siri commands.
How to Setup HomeKit Accessories:
Setting up smart HomeKit enabled accessories on HomeKit is incredibly easy. Apple has made the automation framework easy to setup and configure. The most important thing that you need to make sure when buying an accessory for Apple’s framework is whether or not it is compatible with HomeKit.
There is a list of Best HomeKit Siri enabled accessories below if you are looking to buy one. To check if an accessory works with HomeKit, locate a label that says “Works with Apple HomeKit.” If there isn’t such a label on the accessory then it is not compatible with HomeKit.
How to create a HomeKit home for your smart accessories:
If you are setting up your first HomeKit accessory then the first and foremost thing you will have to do set up a “Home” is HomeKit. Home is basically your house in HomeKit. It will contain all the rooms, zones, scenes, and accessories. You can also have multiple homes in HomeKit. Although, you can only have one primary house at a time.
To setup the HomeKit home first download a HomeKit compatible app of your choice. Every HomeKit accessory comes with a companion app but not all of them are very user-friendly and well made, so it is best to use a third party application to configure HomeKit. There are quite a few apps out there but Home by Mathias Hotchgatherer and Elgato’s Eve are pretty good and easy to use.
After you have downloaded and installed the app, here are the steps you need to take to setup your HomeKit house:
- Open the application.
- Press OK if the app asks you to access your Home data.
- If you are using Elgato’s Eve app, then tap Add Accessory. If you are using the Home app, tap the plus button in the upper right corner.
- Name your home.
After you are done setting up your Home it is time to set up your smart accessory.
How to set up your HomeKit-compatible accessories:
- Connect your device to power. Your accessory may be powered by plugging into a wall outlet or adding batteries.
- Connect the accessory to Wi-Fi or Ethernet.
- Download and open the app for your accessory.
- Follow the instructions in the app for setting up your accessory.
- During the setup process, you will be prompted for theHomeKit setup code: It has the HomeKit house next to an eight-digit number separated into three groups. Enter the code into the application.
After completing these steps you will have successfully added your accessory to your HomeKit house. Now you can customize the accessory’s name, add it to rooms, zones, scenes, and triggers, and control it with Siri commands.
How to control HomeKit devices outside your house:
If you want your lights to activate before you arrive in your home. Or if you want to turn on the thermostat, or control any other accessories while you are out of the house it is possible with HomeKit. You can use the app to control it, but if you have an Apple TV or iOS 9 then you can also use the Siri commands to control the accessories when you are out of your house.
If you have iOS 9 in your Apple device then your iPhone can securely communicate with your HomeKit house. This is possible because of HomeKit’s new accessory protocol (HAP). The protocol uses secure networking over iCloud to talk to your connected HomeKit products.
However, HAP doesn’t work with previous versions of iOS. So, if you are using iOS 8 on your Apple device then you will need an Apple TV to control your house outside of your local WiFi network range.
HomeKit Siri Commands:
Apple HomeKit automation framework’s support page was updated a while back. The update has added the complete list of Siri commands that can be used on HomeKit Siri- enabled accessories.

Siri commands act as the main way to control the automation framework. Siri makes it easy to control and communicate with your smart accessories by simple commands. Most of these commands are simple like turning an accessory off or on. Siri commands can also be used to adjust settings of HomeKit enabled accessories in your home.
The command list also includes several commands that will be used for smart accessories that are grouped into homes, scenes, zones or rooms.
As more HomeKit enabled products hit the market we can expect this list to expand and include more commands and even a few more complex ones. But, for now here is the full list of Siri command for Apple HomeKit accessories:
- “Turn on the lights” or “Turn off the lights.”
- “Dim the lights” or “Set the brightness to 50%.”
- “Set the temperature to 68 degrees.”
- “Turn on the coffee maker.”
If you have setup rooms, scenes, zones, and homes then you can use these commands to control the HomeKit enabled accessories:
- “Turn on the upstairs lights.”
- “Set the Tahoe house to 72 degrees.”
- .“Set the dinner scene.”
- “Turn off Chloe’s light.”
- “Make the living room lights the brightest.”
- “Set the thermostat downstairs to 70.”
- “Turn on the printer in the office.”
- “Set up for a party, Siri.”
- “Dim the lights in the dining room to 50%.”
- “Set my bedtime scene.”
The important thing to note is that for some accessories like a smart lock, Siri commands won’t work if your Apple device is locked. You will be required to unlock your device before you can use it to make Siri execute a command.
The HomeKit support page also includes other basic instructions on how to get started with HomeKit devices. There are several HomeKit enabled product available in the market the best of which we have listed below in the section “Best HomeKit Siri-Enabled Devices.”
How to add rooms, zones, and scenes to your HomeKit:
The Apple HomeKit automation framework offers manufacturers an easy and secure way to connect their home automation accessories to iCloud, Siri, and your iPhone or iPad.
HomeKit also allows you to setup rooms, scenes, zones and also multiple homes that can be controlled through Siri commands. Multiple HomeKit products can be grouped into scenes which allow them to be triggered by a single Siri command. So, you can communicate multiple devices at the same time with a single command phrase or word.
First, what you will need to do is name your devices, rooms, and zones. Siri has the ability to understand custom names for rooms, zones, and devices. After naming a HomeKit accessory you can control it with its custom name.
You can also group multiple devices into rooms and zones which will allow you to control multiple devices with a simple command. For example, you named you Kitchen in HomeKit now you can use Siri command “Turn on all the lights in the Kitchen”. This command will then turn on all connected lights in the Kitchen.
Rooms are basically used for controlling multiple accessories. With zones, you can control multiple rooms. For example, you can create zones that are named “Upstairs” or “Downstairs.”
Here is a general guide on how to assign names, the steps may vary depending on application used:
How to rename your HomeKit accessory:
- Open any HomeKit app of your choice and find your accessory.
- Locate the Edit button next to the accessory.
- Press Save. Tap the Name field required.
- Name your room and select the devices you want to control it.

How to create a HomeKit Room and add accessories:
- Open any HomeKit app.
- Locate the Rooms tab or setting.
- Tap the plus button to add a new room.
- Name your room and select the HomeKit accessories you want to control with it.
- Press Save.

How to create a HomeKit Zone and add accessories:
- Open any HomeKit app.
- Locate the Zones tab or setting.
- Tap the plus button to add a new zone.
- Name your zone and select the rooms you want to control with it.
- Press Save.

How to create a HomeKit scene:
Scenes are more complex than rooms and zones. In a scene, smart accessories are grouped together with actions. For instance, you could create a scene “Movie Time.” In the “Movie Time” scene you can group accessories like the hue lights, smart lock, and thermostat. You can include actions for those accessories like “Dim the lights to 60%,” “Lock the door,” and ” Lower the temperature to 55.” So, when you say the scene command all the accessories will simultaneously perform the listed actions.
Setting up a scene differs wildly from app to app. The best app currently in the market according to us is the Home app. Although, even it has a few oddities when setting up scenes. Note that scene with multiple words work best with Siri. This is because there is little chance for Siri to misunderstand. It is important to keep your scene names distinctive so that Siri doesn’t confuse it with a different command.
- Locate the Scenes tab in your HomeKit app of choice.
- Tap the plus button to add a new scene.
- Name the scene and press Save.
- Press the new scene and tap the plus button to add a new action.
- Select the accessory you want to add to your scene.
- The accessory will show its current settings when you tap on it.
- Re-select all the actions you’d like to execute for your scene. Those actions will highlight blue once you have modified them.
- After doing that, tap the Home name in the upper left corner.
- Add actions for any other accessories you want to control.
- Press Done when you are finished.
- Press Execute to see a preview of the scene, or say the scene name to Siri.

Using names, rooms, and zones with Siri:
After you are done naming your accessories, rooms, and zones, you can use those names to control your accessories via Siri. It may take awhile for Siri to register those names, so wait for some time if it doesn’t happen immediately.
How to share HomeKit access:
If you have guests over at your house and you have installed Apple HomeKit automation framework you should know that you can easily grant access to your HomeKit to your guests. As a side note, you should be wary when giving access to your HomeKit to guests especially if you have a smart lock installed. It is best to give access to only those who you trust and those who won’t try to annoy you by switching the lights on and off.
Aside from guests, it is possible that you have multiple housemates. So, of course, you will have to grant them access as well. Doing that isn’t difficult, and we are going to walk you through the process in this article.
When you create a HomeKit house, initially it is tied to your unique Apple ID by default. No one can access or control you Apple HomeKit house without access to your account. HomeKit also allows you to grant access to other people, so you don’t have to be the only one to control your HomeKit house. To do so you will have to add the people that you want to grant access into HomeKit.
There are two access modes that you can grant a person management control and accessory access. This way you can belong to multiple HomeKit homes. Here is how you add a person to your HomeKit house:
How to add another person to HomeKit:
Adding a person to your HomeKit house is very simple. Firstly, you will need to know their Apple ID. After that, all you need to do is send an invite to the Apple ID. When the person accepts the invite he/she will be added to your HomeKit house and granted the specified access. To do this you will need iOS9 or later, and of course your HomeKit house should already be setup. Here are the steps that you need to follow:
- Open the Settings app on your iPhone.
- Scroll down to the HomeKit option and select it.
- Tap on your home.
- Tap Invite People.
- Enter the iCloud address of the person you wish to add to your HomeKit home.
- On the recipient’s device, press the Accept button on the banner.
- If you don’t see the banner then go to Settings > HomeKit if they miss the banner.
How to remove a person from HomeKit:
Removing a person from you HomeKit house is also quite simple. After a guests stay is ended at your house it is best to remove them from your HomeKit house as a security measure. Moreover, giving your guest indefinite access and control of your home is probably not a good idea. Here is what you need to do to remove a guest from your HomeKit House:
- Open the Settings app on your iPhone.
- Scroll down to the HomeKit option and select it.
- Tap on your home.
- Swipe left on the person’s name.
- Tap Delete to remove the person from you HomeKit house.
How to Control HomeKit guest house:
If a person has granted you access to their HomeKit house then as a guest user you will have access to almost all the HomeKit controls that an administrator has access to.
You can control accessories and access their data. For example, you can make the light change colors or brightness via Siri commands. Or, you can ask for thermostat readings. You can also view the house and all accessories in it by using apps like Home by Mattias Hochgatterer or Elgato’s Eve. You can also change switches and toggles by using those apps.
Furthermore, Any rooms, scenes, or zone the homeowner (administrator of HomeKit) has created will also be available for you. You can easily use Siri commands to set a scene or specify an action for a room or a zone. However, you won’t have access to trigger set by the Home
However, you won’t have access to trigger set by the Home administrator whether they are event-based or time-based. Moreover, you also cannot rename accessories or delete them from the house. You also cannot add new accessories or delete the HomeKit house itself.
How to Troubleshoot HomeKit Accessories
Check whether or not you are logged into your iCloud account:
If you are having trouble using Apple HomeKit on your primary device or an auxiliary one, firstly check and make sure that you are logged into your iCloud.
Do this by going to Settings > HomeKit.
The theory is that any device that has been logged in by your Apple ID should be able to understand and execute HomeKit commands. So if your Apple device is not communicating with HomeKit it is possible that you are logged out.
If nothing is working then check your network connection and reset all accessories:
Did you launch a HomeKit application and got nothing? Then if you are encountering such a problem then you should carefully check and see that your network is online. Moreover, after checking the network make sure all of your HomeKit enabled accessories are connected to your network via ethernet or WiFi.
After checking and connecting everything if you are still not getting any sign that you are connected then you may want to try and reset your hardware.
All HomeKit manufacturers have slightly differents methods for doing this. It is best to check a manual or refer to official online guides. Usually, this process requires you to simply press a tiny button located somewhere on the bridge or hardware.
Resetting your accessories will not delete your HomeKit house.However, all the individual accessory connections to HomeKit will be reset. After resetting open you HomeKit app and add the accessories again. Hopefully, this will solve the problem and your HomeKit automation framework will start functioning normally.
If your HomeKit accessories are working inside the application then iOS may be causing trouble:
Whether you can’t get a guest to connect to your network or have yourself lost connection to Siri you will need to check the app you are using to control HomeKit. To do this open the specific app and then see if the buttons are responding or not. If the buttons are still working inside the app then this might be the indication of a bug in the iOS side of things.
First of all, like in most cases, try logging out of iCloud and then logging in again, consult the “How to reset HomeKit Sync” section for help in doing this.
If this doesn’t work then you will have to try something a bit more complicated, that is you will have to reset your HomeKit settings. This is the last option and if you do this you will have to rebuild your HomeKit home from the very beginning.
Resetting your HomeKit setting is a pain but if all else fails then this is your best choice for fixing the problem. Here s what you will need to do:
- On your iPhone or iPad go to Settings.
- Then go to Privacy > HomeKit.
- Locate Reset HomeKit Configuration and tap it, then confirm.
Resetting HomeKit configuration will wipe out all the stored rooms, zones, and house names. After this. you may also have to pair some of your accessories again.
When you open your selected app for HomeKit accessories after the reset you will be asked to give your connected home a new name. You will also have to link your HomeKit bridge or other connected accessories again to HomeKit.
If you can’t add a guest to your network do this:
When adding guests to your network you may encounter two issues. One involves the invited status and the second problem is the invite not showing on the recipient’s device. Fixing these problems isn’t hard but it is tedious here is how to do that:
The Apple device may be displaying a never-ending “Invited” status even after your guest has accepted your Apple HomeKit invite into your House. Usually, this issue arises because of server delay. Because of the delay the invite status changes after a period of time.
To fix this problem the best approach would be to try removing the initial invite and then send an invite again. This may help solve the delay but if it doesn’t login out of iCloud and then login in again should solve the issue.
Then there is the issue of your invite is not showing up on the recipient’s iPhone, iPad, or another iOS device. There can be two reasons for this problem. It is possible that you made a typo or an error in the invited address if not then it could be because of some unknown problem.
The best way to fix this problem is same as that of the previous one. Try deleting the initial invite and then send an invite from HomeKit to the guest again. This solution works 90% of the time but if you are still encountering problems login out and then back into iCloud should fix them.
If all fails then worst case scenario is that you will need to reset your HomeKit configuration.
If you are on LTE then you might need Apple TV:
HomeKit devices are designed to primarily work in the reach of your WiFi network. But, if your HomeKit manufacturer has built in support for HomeKit Accessory Protocol (HAP) and if you have iOS 9 on your device then you will be able to access you smart accessories on LTE.
However, if you can’t do this then you may need to get an Apple TV. Normally all Siri command and handshaking occurs within the confines of your WiFi network. But, your Apple TV combined with your unique Appl ID allows you to securely communicate with your Apple HomeKit accessories even when you are outside the house or outside the boundaries of your network.
This is done by a combination of iCloud Keychain and HomeKit framework. For example, suppose you are on LTE and you press the Home Button to activate Siri and give a command to “switch on the lights.” Now, if you don;t have Apple TV or iOS 9’s HAP Protocol support then the command will result in Siri replying “I can’t do that.”
However, if you have Apple TV or Apple HomeKit Accessory Protocol support then the command will travel over your cellular network to you set top box and handshake using your Apple ID. Then the Apple TV will relay the command to you installed HomeKit bridge. The Apple HomeKit bridge will execute the command and the lights will turn on in your home.
To setup, your Apple TV with HomeKit all you have to do is log out of your iCloud account on your Apple TV and then login back again. After doing this you Apple TV will be HomeKit enabled.
How to reset HomeKit sync
If your Apple HomeKit house is having trouble syncing or it has outright disappeared, here is a guide on how to fix it. If you update your Apple iOS device to iOS 9.2 you may encounter a bug that will cause your HomeKit house to vanish. The good news is that you won’t nee to reset you HomeKit house to solve this problem.
What the bug actually does is that it glitches the iCloud syncing. As a result, the Apple HomeKit data in iCloud stops syncing with the iOS device which in turns displays that the device has no data.
If you encounter this sort of bug, here are a few troubleshooting steps that will allow you to fix the problem.
Step 1: Reboot your device.
Before trying anything extreme or complex, try rebooting your Apple device. Sometimes a simple reboot is all your iPhone or iPad needs to fix itself back with the iCloud sync repository.
Step 2: Turn iCloud Keychain off.
If a device reboot doesn’t fix the problem then try rebooting ]your iCloud Keychain. Since your Apple HomeKit data syncs via iCloud’s encrypted storage locker, turning it off and on again will force a re-sync between the keychain and your device.
Before rebooting the iCloud keychain, make sure that you remember your security code or have another iOS device that is logged into iCloud so that you can easily reauthenticate your Apple iPhone.
- Go to Settings > iCloud.
- Tap on Keychain.
- Turn the iCloud Keychain off.
- Reboot your iOS device.
- Go to Settings > iCloud > Keychain, from here turn iCloud Keychain back on.
- Approve iCloud Keychain via security code or another device.
- Wait a few minutes to see if your House data reappears; if it doesn’t, try rebooting your device again.
![Apple HomeKit]()
Image Credit: iMORE

Step 3: Reset your iCloud account on your device
If simply rebooting iCloud Keychain or your device didn’t fix the bug then it’s time to try something more complex and extreme. What you will need to do is log out of iCloud from your device. This can be annoying for multiple reasons. but the biggest inconvenience is that it resets all credit and loyalty cards you have in Apple Pay. Nonetheless, if you the previous steps didn’t work out then this is your only option.
To reset iCloud sync you will need to have a second Apple ID. If you don’t have one you can create one for free at the sign in screen. So, here are the steps you need to take to fix your iCloud sync:
- Go to Settings > iCloud.
- Tap on Sign Out, and then confirm.
- Afterward, a prompt will pop up in your device saying that all iCloud-stored notes and pictures will be removed from your device. Tap Delete to confirm.
![Apple HomeKit]()
Image Credit: iMORE - Tap Keep on My [device] when iCloud prompts you about locally-stored News data, Safari data, calendars, and more. This will help reduce sync time.
- Enter your Apple ID password and tap Turn Off.
- After your account has been disabled, return to the iCloud settings screen.
- Create a new iCloud account or Log in with your other iCloud account if you have one.
- Tap on Don’t Merge when prompted about your data.
![Apple HomeKit]()
Image Credit: iMORE - Log out of the secondary iCloud account and repeat steps 2 till 5.
- Login again into your primary iCloud account.
- Tap Merge when prompted about your data.
- Go to the Keychain screen and turn your iCloud Keychain back on.
- Approve iCloud Keychain via security code or from another device.
- Wait a few minutes to see if your House data reappears; if it doesn’t, try rebooting your device again.


Hopefully, these steps will help you fix your iCloud sync problem. If you are lucky you will be able to fix your bug without having to reset your iCloud sync.
How can HomeKit Improve in the Future:
When a technology is in its initial phase it is bound to have some flaws and glitches. Similarly, like all new technologies, it will take time for Apple HomeKit to refine and reach perfection. Home automation isn’t a new concept but it is not mainstream yet. Apple is determined to make HomeKit a success and provide easy, accessible, and reliable home automation.
The company still has a long way to go. Apple HomeKit is already quite amazing in many ways, but it still possesses a few bugs and lacks a few features. Here’s how we think the HomeKit will improve in the future:
More Triggers:
Currently, we can seamlessly control smart accessories by using Siri commands. Although, the real gem of automation is that it is really about scheduling repetitious actions and letting the technology do the work. Apple HomeKit lets you automatically engage scenes, or groups of set actions, using triggers, or certain conditions like time of day.

There are triggers that we can set that we operate a certain accessory at a particular time every day. For example, you can set your outdoor lights to turn on at 7:30 PM and turn off at 6:00 AM. But what would make HomeKit better is if it included triggers for times that may change. For example, a sunset and sunrise trigger would be brilliant.
More Siri Commands:
While we can do amazing things using Siri-voice commands on smart accessories, Siri still can’t always control your Apple HomeKit setup.
Read More: Best Tennis Gadgets to Improve your Game
For example, if you use Siri voice commands from CarPlay to turn off your lights the Siri gets confused and a message pops saying Siri can’t control your car.
Similarly, If you ask Siri on Apple TV to dim the lights then on-screen text reads “Sorry I can’t help you with that here.” Why not? setting a Movie Night scene is probably one of the popular uses of Apple HomeKit. Lower the temperature, set Hue lights to 30% brightness, lock the front door and enjoy your movie. Now, scenes are easily created in HomeKit but you can’t use the Siri Remote on Apple TV to set them. Instead, you’ll need to use your iPhone, iPad, Apple Watch, or iPod touch.
More HomeKit enabled Accessories:
Apple HomeKit works with a variety of smart accessories like plugs, thermostats, locks, shades, sensors, lights etc. But, in the future, one of the main improvement aspects that need to be focused on to make HomeKit better is coming up with a wider range of accessories.
Apple HomeKit had a slow start when it was introduced a couple of years ago. But, recently the automation framework has been gaining popularity swiftly. HomeKit accessories variety in the market has expanded greatly since last year. The future of home automation seems to appear bright. Several new technologies are currently in development. However, Apple HomeKit will need to step up its game if it wants to rule the home automation market.
The post Best Apple HomeKit Enabled Accessories: Your Complete Guide to a Smart Home appeared first on MobileSiri.


